Wednesday, December 14, 2016

Heartwarming Minestrone


Minestrone is the general term for any kind of thick soupy dish in Italy but translated as "vegetable soup" into English comes from the Italian word "minestra" which means soup. You can find hundreds of recipes on the web for minestrone but to be honest, there is no set recipe for it and this is why I love this dish.

Main idea, this is a vegetable and legume soup with addition of pasta. It can be vegetarian or you can have meat addition. What you use is regional and seasonal, this is the other idea I always support in food. The most common use is onion, garlic, carrot, celery, lentil, beans; barlotti beans is the common version in Italian cuisine and pasta addition at the very end.

How I cooked my minestrone...
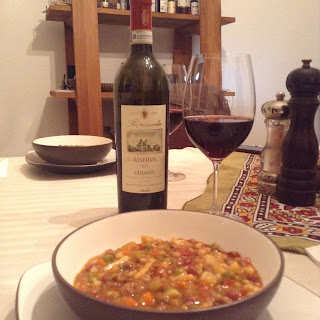
I cooked mine with beef, chopped my beef into small cubes and sautéd with onion and garlic. Added small diced carrot, celery, potatos and peas. I had soaked red lentil, green lentil and pearled barley and boiled some adzuki beans and small white beans after soaking. I add all boiled and soaked legume, some hot water, about a table spoon of tomato paste and pepper paste and some spices and dried herbs; cumin, turmeric, oregano and thyme. Of course some salt and pepper to taste.
I like using heavy cast iron pots. I cooked my minestrone on very low heat for about two hours till it turn into a concise texture.
I paired my minestrone with a nice bottle of Italian DOCG wine, 2013 Chianti Classico Reserva since rustic soups with beans pairs well with medium bodied rustic red varietal like Syrah, Sangiovese or Cotes du Rhone.

Sunday, September 25, 2016

All About Burgers


The first secret of good burgers is to start with good quality beef. When you buy your beef ground you never can make sure about what is going into it. I you have the facilities to grind your own beef, my recommendation is grinding your own meat instead of buying ground stuff.
This time I didn't do what I say; I had organic and free range Australian 80% Lean, 20% Fat ground beef and I make use of it.  
About seasoning your ground beef, it is up to you, use the spices you like better. 
What I used for my seasoning is; 
Garlic Powder
Cajun Blackened Seasoning
Dried Porchini Salt
Fresh Ground Pepper (Black&White Pepper mixture)
Mix your seasoning mixture in your ground beef and let it sit in your fridge for at least half an hour.
Make uniform size and shape patties so they cook even. You may have precise eyes but I believe in perfection, so I scaled my ground beef and created 4 equal patties, 115 gr (about 4 oz each). When it comes to cooking even, thickness matters, my patties were 2,5 cm (1 inch) thick.


I prepared my patties before we started the BBQ so I let them sit in the fridge while getting my charcoal going. 
About cooking your burger if you don't feel like struggling with BBQ you can simply sear it in a pan, heavy cast iron pan would be ideal.
For both techniques I recommend you use a thermometer to test the inner temperature of your meat while cooking. Do the temperatures mean nothing to you? Ok, here is a simple estimated guideline;
  Rare; 49°C /120°F and below 
  Medium Rare; 54°C /130°F 
  Medium; 60°C /140°F
  Medium well; 66°C /150°F 
  Well done; 71°C /160°F and above

  Bread you use also matters, try to get some nice buns, if you have time, you can bake your own buns, not so difficult, it will be another topic on my blog.

 
  About assembling the burger, it is up to your taste, my preference is always roasted/grilled vegetables, slice of nice juicy organic beef tomato, some salad greens, lettuce, arugula, etc. The common way is using some ketchup and/or mayonnaise. You don't need lots of heavy sauces and dressing if you start with good quality ingredient.

Saturday, August 6, 2016

Beer-butt Chicken


This is a really fun and effective way of cooking a whole chicken. Your chicken stays juicy and moist and you get to drink half of the beer during the preparations :)
What I did;
I brined the chicken overnight, the ratio of brine is 1 cup salt for 16 cups of water, and some herbs and spices to your taste. My chicken was not too big, I dissolved 1/2 cup salt in 8 cups water and used black peppercorns, allspice, bayleaf and dried oregano. I'll write more about brining in a separate post.

After brining, I take my chicken out of the brine and let it drain about an hour, it will also bring the chicken to room temperature which is advised to start the roast at and pat dry before starting the preparations. I opened pockets under the skin by gently pushing with my finger, trying not to tear the skin and filled with rosemary, garlic, lemon and fennel. Lightly salt and peppered the skin, that's it...


It's time to get it ready for the oven; I opened a can of beer and of course take my share :) You need to empty half of the can to prevent eruptions in the oven.


I put some crushed garlic and rosemary with the branches into the can and place the chicken's cavity like a cap on the can, as if chicken is sitting on the beer can, I know it sounds nasty but we do it this way for a good reason :)

Place your chicken in a deep baking tray, it is good to go into the oven. You can place vegetables in the same tray which will make perfect sides, I placed potatoes; peeled and cut into quarters and let it cook with the chicken.

Roast your chicken at 350 Degrees F/ 180 Degrees Celsius about 1-1,5 Hours, cooking time varies depending on the size of chicken and your oven. The color of the skin will tell you. If you have a kitchen thermometer check the internal temperature at the thickest part of the thigh which should be 165 Degrees F/ 74 Degrees Celsius.


Thursday, July 21, 2016

Lion's Mane and Shrimp paired with Sancerre


Lion's Mane Mushroom


     This is my first post from our new home in beautiful and peaceful Westport, CT. Today my neighbor Susan take me to our local farmers' market just around the corner from home; 50 Imperial Ave, Westport. It was very organized and very pleasant to visit. There was a very unusual stand for me which got me very excited; Pine Lake Mushrooms from Ivoryton, CT. I met Lion's Mane Mushrooms for the first time in my life, never heard of it before. I was excited with my new discovery and the result was very satisfying. 
I sautéed the mushrooms as side for sautéed shrimps and paired with Sancerre. It was quick and easy since sautéing took place in high heat and both for the mushrooms and shrimps are ingredients cooks in short time.  I'm going to share my recipe with you now.


I heated grape seed oil and add two cloves crushed garlic on medium heat,


Browned my sliced mushrooms on both sides,


When mushrooms are browned added white wine on high heat,


Add fresh oregano for nice flavor and butter to give some creamy texture, back to low heat.


And salt and pepper to taste...

I take the mushrooms in my plate and continued in the same pan. 


Added my peeled and cleaned shrimps and some butter, 


Added Old Bay Seasoning,

And sauté both sides till get little bit brown on high heat and take it out to the plate.

Do not overcook the shrimps.


Pour some wine enough to cover the bottom of the pan and get this nice creamy sauce with the leftover juice from the mushroom and shrimp. Very rich and yummy dressing.


Sprinkle with some finely chopped fresh parsley.


I paired my dish with Sancerre.


Friday, June 3, 2016

Sous Vide Cooking

 “Sous vide” means “under vacuum” in french and refers to the technique of cooking it in temperature controlled water bath typically around 55-60ºC/131-140ºF. The technique is about bringing food to a very precise temperature and holding it there for a period of time, which is why we refer to the technique as “precision cooking”. The idea is cook the food evenly, both inside and outside while retaining the moisture. 
        To apply this technique you need an immersion circulator which is now designed for home use and easier and cheaper to get and good news if you have a small kitchen, easy to store. It clips onto the side of a pot or any container that you can fill enough amount of water. It brings your water to the required temperature and continuously circulates the water to keep the temperature even. You just place your vacuum sealed food in the water. If you do not have a vacuum sealer, do not worry, zip lock bags do the job as well. As your sous vide gadget is circulating your water, place your zip lock bag with your food in the water carefully, the immersion will apply pressure on the bag, just zip it and clip it in the side of your container.


    The advantage of sous vide cooking is gentle, oxygen-free cooking environment helps retaining its nutrients  Proteins can be served at lower temperatures than when following traditional cooking methods. The increased minimum cook time for the sous vide cooking process essentially pasteurizes the meat, which means that medium-rare meat is perfectly safe to eat. 
                         Retail-VI-past.jpg
     The other advantage is foods cooked in a vacuum-sealed bag are far more shelf stable than those cooked on the stovetop, this means you can cook meals ahead of time without worrying about your dinner spoiling. You can prepare perfectly cooked food and have it ready to serve in couple of minutes with very little effort. 
      I will be sharing couple of recipes that I prepare with sous vide technique soon. Just follow my blog...

Sunday, May 8, 2016

Beef Carpaccio


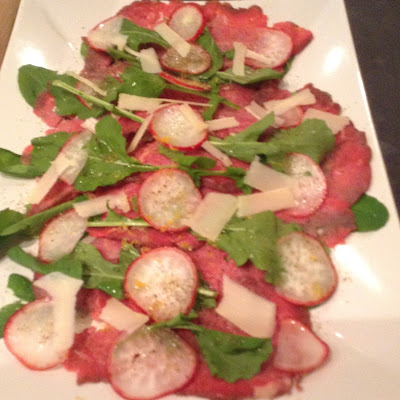
   Carpaccio is an Italian dish mainly served as appetizer from Piedmont region of Italy. Piedmont is known for it's "Carne Cruda" which means "Raw Meat" and carpaccio is one of the best known carne cruda which is thinly sliced raw beef  which can also be veal, venison, salmon or tuna.
     The most important thing to make beef carpaccio is finding really fresh and good quality beef and using the right cut of the beef. Tenderloin is the right part of the animal, using filet mignon which is the smaller end of the tenderloin would the nicer since it is more tender and lean. You serve it on greens with salt, pepper, lemon juice and parmesan shavings, arugula is my favourite, the peppery taste compliments very well with the beef cut. This time I had really nice and fresh radish, the crunchiness and the colour was great addition to the dish.


     It has to be really thin cut. The general consensus is wrapping tight in stretch film and freezing and cutting with a slicer, it will give you perfect cuts. You can still have good looking slices by hand. If you do it by hand there is two ways you prepare your carpaccio; after you slice your beef as thin as you can by hand, you can press and pull with your knife or you put your slices between two parchment paper and pound gently or roll with a rolling pin. To me, the best result is rolling the slice between parchment papers.